menu tháng 9 2016 ~ Tasty

About

Hot Dog Cups

Are you ready?

Liege Waffles With Nutella

Liege waffles are possibly one of the most delicious little treats you could conjure up.

Cherry Moscow Mule

How corny!

Matcha Pancakes With Hot Chocolate Ganache

Valentines Day Matcha Pancakes With Hot Chocolate Ganache and Strawberries!

Thứ Năm, 29 tháng 9, 2016

Liege Waffles With Nutella


Preparation time: 30 minutes plus 1 hour 10 minutes waiting time
Cooking time: 30 minutes
  • 2 teaspoons instant dried yeast
  • 1 teaspoon white sugar
  • 1/4 cup milk, warmed to room temperature (not exceeding 48.8°C/120°F)
  • 2 - 2 1/4 cup plain all purpose flour
  • 2 eggs, at room temperature
  • 113g/1 stick/1/2 cup butter, melted and cooled for a few minutes
  • 2 teaspoons honey
  • 2 teaspoons best quality vanilla
  • 1 teaspoon salt
  • 2 cups Belgian pearl sugar*
  • 50g/1.7ozs butter, melted
  • Nutella to serve
*Belgian pearl sugar is needed to create these waffles as the hard sugar crystals caramelise against the hot element. You can buy Belgian pearl sugar from The Essential Ingredient and other fine food stores. It is not available at the supermarket.
Step 1 - Stir the sugar into the milk and then stir in the yeast. Cover with cling film and allow to foam and bubble for 10 minutes. Add 2 cups of the flour to the bowl of an electric mixer, Place the eggs, butter, honey, vanilla and salt in a jug and whisk to combine. Add this to the flour along with the yeast mixture and knead for 4-5 minutes using a dough hook. It is a soft, buttery dough but it may need the extra 1/4 cup of flour to be able to shape it.


Step 2 - Shape the dough into a round and place in a warm, draught free area for an hour or so until doubled in size. Then knead 1.5 cups of pearl sugar into the dough making sure to reserve 1/2 a cup. Divide into 12 equal pieces and shape into rounds. Allow to rise again for 10 minutes.


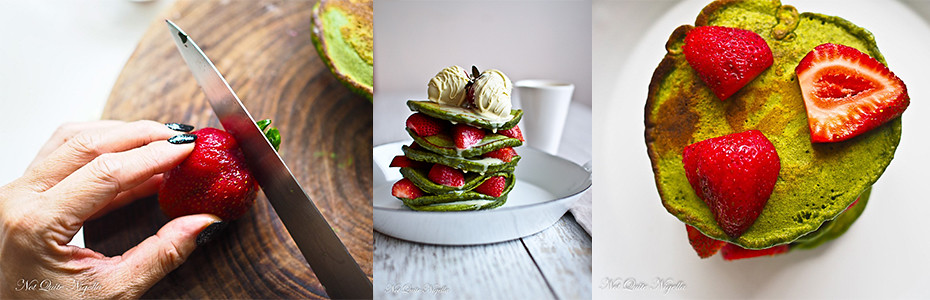
Step 3 - Heat a waffle iron to the full heat-you basically want it to get to 185C/365F as this is the temperature at which the pearl sugar melts. Brush lightly with the extra melted butter and sprinkle some extra pearl sugar on each side of the dough rounds. Cook for 2.5 minutes. Be careful when removing them as the sugar is very hot. Serve with Nutella and fresh fruit.


View more in:  Not Quite Nigella

Mexican-Style Street Corn (Elotes)

Mexican-Style Street Corn (Elotes)
Serves 3

INGREDIENTS

3 ears of corn, hulled
3 wooden skewers
¼ cup melted butter
½ cup mayo
2 cups cotija cheese
3 teaspoons chili powder

PREPARATION

1. Boil the corn for about 5 minutes.
2. Push a skewer through the middle of each ear of corn.
3. Drain, then brush them evenly with the melted butter.
4. Spread a bit of mayo all over each ear of corn.
5. Scoop the cotija cheese generously on the corn, making sure it covers all sides.
6. Sprinkle a little bit of the chili powder evenly across the corn.
7. Serve!


View more in:

Thứ Ba, 27 tháng 9, 2016

3-Ingredient Dinners

3-Ingredient Dinners


Mac & Cheese

Mac & Cheese
Servings: 3-4
INGREDIENTS
5 cups milk
1 lb dry elbow macaroni
2 cups shredded cheddar cheese
PREPARATION
1. In a large pot, bring the milk to a boil.
2. Add the pasta and stir constantly until the pasta is cooked, about 10 minutes.
3. Turn off the heat, then add the cheddar.
4. Stir until the cheese is melted and the pasta is evenly coated.
5. Enjoy!


Chili-Glazed Salmon

Chili-Glazed Salmon
Servings: 3
INGREDIENTS
3 4-ounce salmon fillets
½ cup sweet chili sauce
¼ cup chopped scallions
PREPARATION
1. Preheat oven to 400°F/200˚C.
2. In a bowl, mix together the salmon, chili sauce, and the scallions.
3. Place the fillets on a baking tray lined with parchment paper. Spoon any leftover sauce on top of the salmon.
4. Bake for 12-15 minutes, until the salmon is cooked but still tender.
5. Enjoy!

Cajun BBQ Ribs

Cajun BBQ Ribs
Servings: 2-3
INGREDIENTS
1/2 rack baby back ribs
3 tablespoons Cajun seasoning
1 cup BBQ sauce
PREPARATION
1. Preheat oven to 250°F/120°C.
2. Rub the Cajun seasoning evenly over the top and bottom of the ribs.
3. Bake for 2 hours, until ribs are tender.
4. Increase oven temperature to 500°F/260°C.
5. Brush the BBQ sauce evenly over the top and the sides.
6. Bake for an additional 15 minutes, until the sauce is bubbly and caramelized.
7. Serve with the extra BBQ sauce!
8. Enjoy!

Teriyaki Chicken

Teriyaki Chicken
Servings: 2-3
INGREDIENTS
2 pounds chicken thighs, sliced into chunks
1 cup soy sauce
½ cup brown sugar
PREPARATION
1. Sear the chicken thighs evenly in a pan, then flip.
2. Add the soy sauce and brown sugar, stirring and bringing to a boil.
3. Stir until the sauce has reduced and evenly glazes the chicken.
4. Serve with rice, if desired!
5. Enjoy!

How To Grow Vegetables From Kitchen Scraps


Instructions for the lettuce:

1. When cutting, keep approximately 2 inches of the base intact.
2. Set the lettuce on its base in a glass with ½ inch of water, and place it in sunlight. Change the water every day.
3. After 5-7 days, some new leaves should have begun to sprout from the center, and roots should be forming. Transfer it to soil and you can begin harvesting leaves when they reach 6-8 inches tall.


Instructions for the mint and basil:


1. Cut approximately 3 inches from a fresh stem, just above a node. Remove the leaves along the bottom 2 inches of the cutting.
2. Place the cuttings in water, keeping the leaves on top above the water.
3. After roots have formed and grown 2 inches, transplant to soil. You can begin harvesting when the plant is fully grown with mature leaves.


Instructions for the green onion:


1. When cutting, keep approximately 2 inches of the roots and base intact.
2. Place the roots in ½ inch of water with sunlight. Change the water every other day.
3. Transfer to soil after 5-7 days or keep in the glass of water. You can begin harvesting when they are fully grown.


Instructions for the celery:


1. When cutting, keep approximately 2 inches of the base intact.
2. Set it on its base in a glass with ½ inch of water with sunlight. Change the water every other day.
3. After 5-7 days, the leaves in the center should be a deeper green. Transplant it to soil and you can begin harvesting when it is fully grown with stalks.


Instructions for the onion:


1. Your onion scraps should still have approximately 1-2 inches of the root base intact.
2. Plant directly into soil with a thin layer of soil covering the cut top. To make room in your garden, you can trim the sides of the onion as only the center is needed for regrowth.
3. Harvest the onions when the green tops have yellowed and fallen over.


Instructions for the garlic:


1. Select the large outer cloves from your bulb.
2. Plant directly into soil with the base facing downwards. Cover with approximately 2 inches of soil and pat down firmly.
3. They are ready to harvest when the green tops have started to brown and wilt.


View more in: https://www.facebook.com/officialgoodful/

How To Organize Your Tupperware For Good

Here’s what you need:


A pegboard cut to the size of your drawer3 square rods cut to drawer width3 or 4 dowels (¾ in / 2 cm thick)1 dowel that can fit through the pegboard holes (⅛ in / 0.3 cm thick)A hand saw, or small electric sawWood glueHere’s the instructions:1. Empty your cluttered drawer and place three square dowels parallel to each other inside.2, Lay the pegboard over top of the rods.3. Measure the height of the drawer, and cut the wooden dowels to size so they can stand vertically inside, and the drawer can still close. Cut about 10-20 depending on your needs.4. Glue a small piece of the smaller dowel (about 1.2 inch) to the top of each large one. Let dry for 2 hours.5. Place the rods into the pegs in rows to organize plastic containers, lids, glassware, and even larger pots and pans. The pegs can easily be reorganized to accommodate new dishes.6. Enjoy staying organized!

Inspiration for living a more balanced life.


View more in: https://www.facebook.com/officialgoodful/

Zucchini Parmesan Fries

Zucchini Parmesan Fries
Serves 4-6

INGREDIENTS

For the zucchini fries:
2-3 zucchini squashes
2 cups plain breadcrumbs 
1 cup grated parmesan cheese
1 tablespoon chili powder
½ tablespoon garlic powder
1 teaspoon kosher salt
For the cilantro-lime yogurt sauce:
1 cup plain Greek yogurt
1 tablespoon minced cilantro
1 tablespoon lime juice
¼ teaspoon garlic powder
½ teaspoon kosher salt

PREPARATION

1. Pre-heat oven to 400°F/200°C.
2. Cut the ends off the zucchini and slice the squash into ¼ inch thick by 2-3 inch long strips.
3. In a larger bowl, mix the breadcrumbs, parmesan, chili powder, garlic powder, and salt until well combined.
4. In a small bowl, beat 2 eggs. Dip the zucchini strips in the egg wash until fully coated, then transfer the strips to the breadcrumb mixture and toss until evenly coated.
5. Transfer the breaded zucchini strips to a parchment paper lined baking sheet lined with parchment paper and bake for 20-25 minutes, flipping the fries halfway through.
6. In a small bowl, mix the yogurt, cilantro, lime juice, garlic powder, and salt until well combined.
7. Enjoy!


View more in: https://www.facebook.com/officialgoodful/

Thứ Sáu, 16 tháng 9, 2016

Brazilian Chicken Croquettes (Coxinha)

Brazilian Chicken Croquettes (Coxinha)
Serves 9 - 12

INGREDIENTS

For the filling:1 tablespoon olive oil
4 cloves garlic, minced
1 onion, diced
2 cups cooked shredded chicken
½ teaspoon paprika
Salt to taste
4 ounces cream cheese
3 tablespoons fresh parsley, chopped
For the dough: 1 tablespoon unsalted butter
2 cups whole milk
¼ cup chicken broth
2 cups all-purpose flour
Additional ingredients:
Eggs
2 cups panko bread crumbs
Oil for frying

PREPARATION

1. In a medium pot, heat olive oil, then sauté garlic and onions until soft and brown. Add shredded chicken, salt, and paprika. Stir to incorporate.
2. Transfer mixture into a bowl, add cream cheese and parsley. Mix well.
3. In the same pot, add butter, chicken broth, and milk. Bring to a boil. Stir in flour until dough is formed.
4. Transfer dough to a flat surface. Knead the dough while it is warm, but not hot.
5. Pinch a piece of dough, about the size of a large egg, and roll into a ball. Using your hands, flatten the dough and spoon filling into the center. Wrap the dough into a pear shape and make sure there aren’t any holes.
6. While heating a pot of oil to 350˚F/180˚C, dredge the dough in egg and panko, then deep-fry till golden brown and cooked through. Drain on a towel and serve immediately.
7. Enjoy!

Easy Fajita Skewers

Easy Fajita Skewers
Serves 12-14

INGREDIENTS

1 to 2 onions, quartered
6 bell peppers, cut in 1.5” squares
1 pound cubed steak
1 pound cubed chicken breast
1 pound shrimp, deveined and peeled with the tail on
3 teaspoons salt (1 teaspoon per protein) 
3 teaspoons pepper (1 teaspoon per protein) 
3 tablespoons garlic powder (1 tablespoon per protein)
3 tablespoons chili powder (1 tablespoon per protein)
3 teaspoons cumin (1 teaspoon per protein)

PREPARATION

1. Place each meat in a gallon sized plastic bag and cover with dry ingredients. Close the bag and shake until evenly coated.
2. Prepare skewers by layering onion, bell pepper, and protein. (Be sure not to mix proteins on the same skewer, as they have different cook times.)
3. Grill the skewers over medium-high heat, flipping once, until the protein’s internal temperatures are as follows: 
For Steak: 155ºF/70ºC
For Chicken: 165ºF/75ºC
For Shrimp: 145ºF/65ºC
4. Enjoy!

Here’s a video that shows you how it’s made: